Are you ready to build a WordPress website? We’re excited to guide you through this journey of WordPress website creation. With its user-friendly interface and powerful features, WordPress has become the go-to platform for millions of website owners worldwide. We’ll show you how to harness its potential to create a stunning and functional website that meets your unique needs.
In this step-by-step guide, we’ll walk you through the entire process to build a WordPress website from scratch. We’ll cover choosing the right web hosting, designing your site with themes, enhancing functionality with plugins, and creating optimized content. By the end of this tutorial, you’ll have the knowledge and confidence to launch your very own WordPress website. Let’s get started on this exciting web development adventure!
Choose and Set Up Web Hosting
Selecting a Reliable Host
When we’re building a WordPress website, choosing the right hosting provider is crucial. We need to consider several factors to ensure our site runs smoothly and securely. Speed is a top priority – look for hosts that offer object caching, a free CDN, and support for the latest versions of MySQL and PHP. These features will help our site load quickly and rank higher in search results.
Security is another vital aspect. We want a host that provides free SSL certificates, web application firewalls (WAF), malware scanning, and DDoS protection. It’s also essential to have the ability to back up and restore our site easily.
As our business grows, we’ll need a host that can scale with us. This flexibility will save us from costly downtime or potential issues when transferring our site to another host in the future. Additionally, we should choose a host with an intuitive dashboard, like cPanel, to make server management easier.
Lastly, we can’t overlook the importance of reliable support. Opt for hosts that offer round-the-clock assistance because we never know when our site might experience issues.
Domain Name Registration
Now that we’ve selected our hosting provider, it’s time to register a domain name. A domain name is the address people use to visit our site, like a street address for a physical business. It tells web browsers where to find our website online and gives our site a professional look.
We have a few options when it comes to domain names:
- Register a new domain through the hosting provider.
- Connect a domain we’ve registered elsewhere.
- Transfer a previously registered domain to our new host.
- Use a subdomain.

If we’re starting fresh, registering a new domain is straightforward. We simply search for our desired domain name, and if it’s available, we can select and register it. Many hosting plans, including annual plans on WordPress.com, offer a free year of domain registration for new domains.
Installing WordPress
With our hosting and domain set up, we’re ready to install WordPress. If we’re using WordPress.com, the installation process is automatic. For other hosts, we have a couple of options:
- Use a one-click installer like Softaculous, which many hosts provide.
- Manually install WordPress for more control over the process.
If we choose to install manually, here’s a quick overview of the steps:
- Download the latest version of WordPress from wordpress.org.
- Upload the WordPress files to our hosting account using FTP.
- Create a MySQL database and user for WordPress.
- Configure the wp-config.php file with our database information.
- Run the WordPress installation script by accessing our domain in a web browser.
After installation, we can log in to our new WordPress site by adding “/wp-admin/” to the end of our domain name (e.g., http://ourdomain.com/wp-admin/).
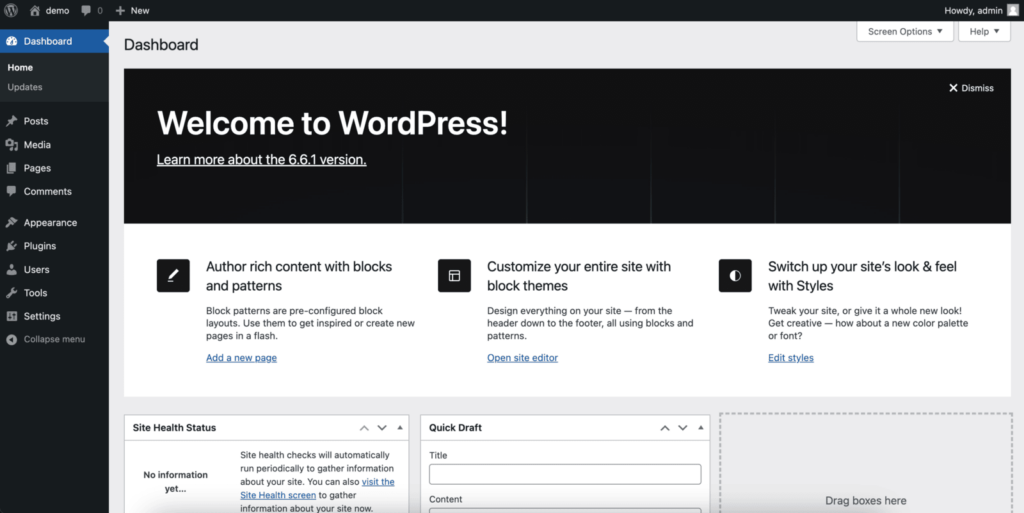
Remember, WordPress.com takes care of updates automatically, ensuring our site always runs the latest version of WordPress and PHP. This built-in maintenance is a significant advantage, keeping our site secure and up-to-date without any extra effort on our part.
Design Your Website with Themes
Now that we’ve set up our hosting and installed WordPress, it’s time to give our website a unique look. Themes are the backbone of WordPress design, allowing us to customize our site’s appearance without diving into complex code.
Finding the Right Theme
We’re spoiled for choice when it comes to WordPress themes. With thousands of options available, it’s crucial to choose one that aligns with our brand and meets our specific needs. Here are some key factors we should consider:
- Responsiveness: Our theme must look great on all devices, from desktops to smartphones.
- Customizability: We want a theme that’s easy to tweak and make our own.
- Performance: A lightweight theme will help our site load quickly, which is essential for user experience and SEO.
- Compatibility: Our chosen theme should work well with popular plugins and be regularly updated.
We can start our search in the WordPress.org theme directory, which offers a vast collection of free themes. For more premium options, we might explore marketplaces like ThemeForest or elegant themes. Remember, it’s not just about looks – functionality is equally important.
Installing and Customizing Your Theme
Once we’ve found our perfect theme, it’s time to install and customize it. Here’s how we can do that:
- From our WordPress dashboard, we’ll navigate to Appearance → Themes.
- Click “Add New” and either upload our theme’s zip file or search for it in the WordPress repository.
- Once installed, we’ll hit “Activate” to apply the theme to our site.
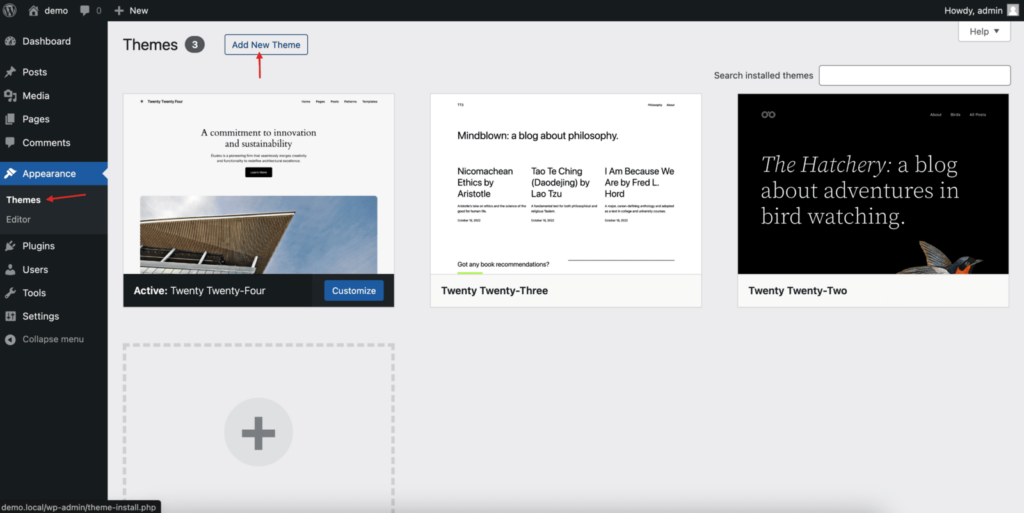
Now comes the fun part – customization. Most modern themes use the WordPress Customizer, which allows us to make changes and see them in real-time. We can access this by going to Appearance → Customize.
Here are some elements we might want to adjust:
- Colors and fonts to match our brand
- Header and footer layouts
- Widget areas and sidebars
- Homepage layout and content
If our theme supports it, we might also use a page builder for even more design flexibility. These tools offer drag-and-drop interfaces, making it easy to create complex layouts without coding knowledge.
Remember, while customizing, it’s important to keep our site’s purpose and target audience in mind. We want a design that’s not only visually appealing but also user-friendly and aligned with our goals.
By taking the time to choose and customize the right theme, we’re setting a solid foundation for our WordPress website. In the next section, we’ll explore how to enhance our site’s functionality with plugins.
Enhance Functionality with Plugins
Now that we’ve got our WordPress site up and running with a great theme, it’s time to supercharge its functionality with plugins. These nifty tools are like apps for our website, allowing us to add features and customize our site without diving into complex code.
Essential Plugins for WordPress
We’ve found that most websites typically need around 20 plugins to function optimally. Here are some must-have plugins we recommend:
- Gravity Forms: This plugin is our go-to for creating all types of forms. Its drag-and-drop interface makes it a breeze to whip up contact forms, registration pages, or surveys.
- WooCommerce: If we’re looking to sell products online, WooCommerce is our superhero. It transforms our WordPress site into a full-fledged e-commerce store, allowing us to sell anything from physical goods to digital downloads.
- Yoast SEO: Think of this as our personal SEO guru. It helps optimize our content for search engines, improving our chances of climbing those Google rankings.
- Jetpack Security: This all-in-one security solution protects our site from malicious logins, spam, and malware. It also includes automatic backups, giving us peace of mind.
- WPForms: Another excellent option for creating user-friendly contact forms, essential for keeping in touch with our visitors.
- Akismet: This plugin is our first line of defense against spam comments, keeping our site clean and professional.
- OptinMonster: Perfect for lead generation, this tool helps turn visitors into subscribers and customers.
- Jetpack Boost: Site speed is crucial, and this plugin helps optimize our WordPress site’s performance with just a few clicks.
Installing and Configuring Plugins
Adding plugins to our WordPress site is a straightforward process. Here’s how we do it:
- From our dashboard, we click on ‘Plugins’ in the left sidebar.
- We can then search for specific plugins or browse popular options.
- Before installing, we always check the plugin’s ratings, last update date, and compatibility with our WordPress version.
- Once we’ve found a plugin we like, we simply click ‘Install and Activate’.
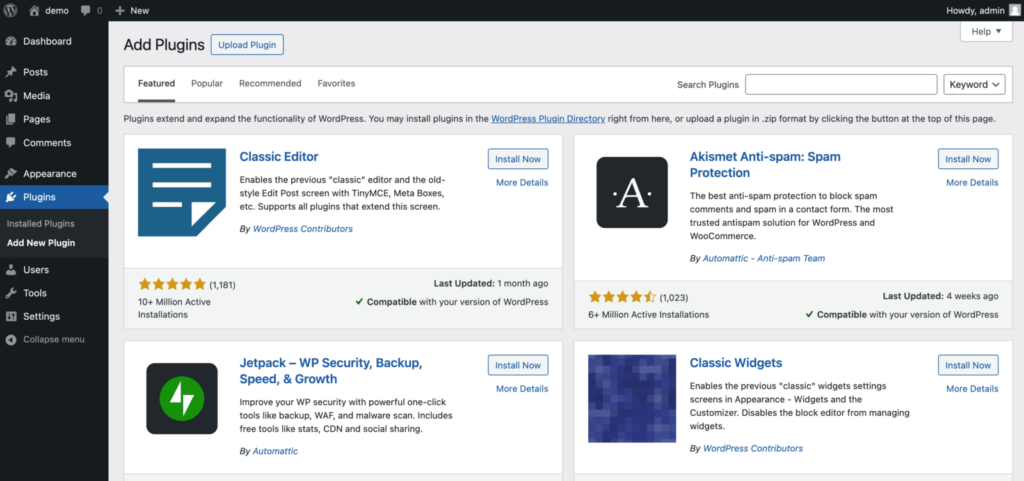
For premium plugins not listed in the WordPress directory, we can upload them manually:
- We download the plugin files (usually a ZIP file) from the provider’s website.
- In our WordPress dashboard, we go to Plugins > Add New > Upload Plugin.
- We then drag and drop the ZIP file or select it from our computer.
- After uploading, we click ‘Install Now’ and then ‘Activate’.
After installation, most plugins require some configuration. We can usually find the settings under the new menu item in our dashboard or by going to Plugins > Installed Plugins and clicking ‘Settings’ under the plugin name.
Remember, while plugins are powerful tools, it’s important not to go overboard. Too many plugins can slow down our site, so we always aim to use only what we need. By carefully selecting and configuring our plugins, we can create a feature-rich, high-performing WordPress website that meets all our needs.
Create and Optimize Content
Now that we’ve set up our WordPress site and enhanced it with plugins, it’s time to dive into creating and optimizing our content. This is where we’ll bring our website to life and make it truly valuable for our visitors.
Building Key Pages
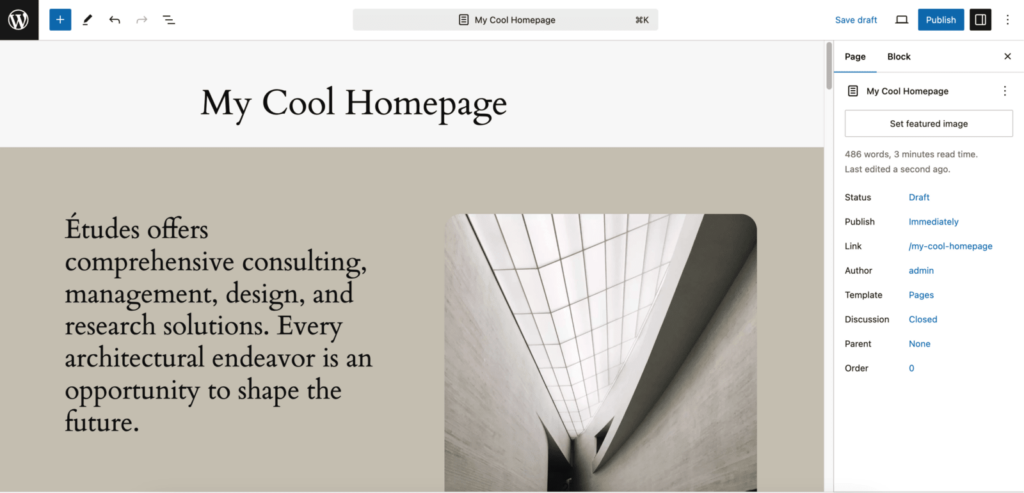
We’ll start by creating the essential pages for our website. In WordPress, we use Pages for non-chronological, timeless content. These are perfect for our About, Contact, and Services pages. To create a new page, we’ll head to our WordPress dashboard, click on “Pages,” and then “Add New.”
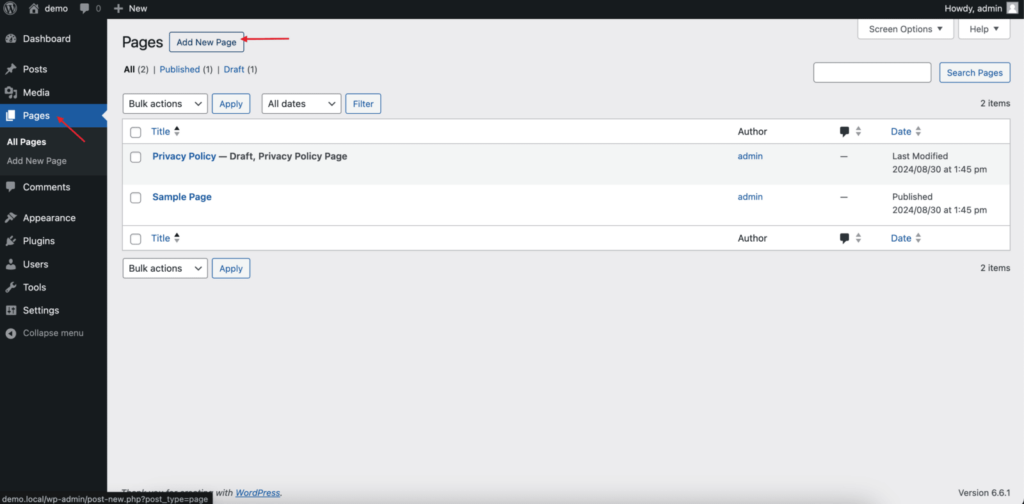
When building our key pages, we need to keep in mind that they’re different from Posts. Pages don’t appear in the chronological blog view and aren’t included in our site’s feeds. This makes them ideal for content that doesn’t change frequently.
We can organize our pages into a hierarchy, creating parent and child pages. For example, we might have an “About” page as the parent, with subpages like “Our Team” and “Company History.” To create a subpage, we’ll use the “Page Attributes” section in the sidebar when creating or editing a page.
Writing Your First Blog Post
Next, let’s create our first blog post. Posts are perfect for regular, chronological content like news updates or blog entries. To start, we’ll go to “Posts” in our dashboard and click “Add New.”
When writing our post, we’ll use WordPress’s block editor. It’s a good practice to write our content in a separate document first and then copy it over. This way, we won’t lose our work if we encounter any connection issues.
We’ll format our post using headings to create a clear hierarchy. This not only makes our content more readable but also helps with SEO. We’ll also add images to break up the text and make our post more visually appealing.
Before publishing, we’ll preview our post to check for any formatting issues. Once we’re happy with how it looks, we can hit “Publish” and our first blog post will be live!
SEO Best Practices
To make sure our content reaches our target audience, we need to optimize it for search engines. Here are some key SEO practices we’ll implement:
- Keyword Research: Before writing, we’ll do keyword research to find terms our audience is searching for. This will guide our content creation and help us rank higher in search results.
- Internal Linking: We’ll link to other relevant pages and posts within our site. This helps search engines understand the structure of our site and improves user navigation.
- Image Optimization: For every image we use, we’ll add alt text that includes our target keyword when appropriate. This helps search engines understand our images and can improve our rankings.
- Meta Descriptions: We’ll write compelling meta descriptions for each page and post. While these don’t directly affect rankings, they can improve click-through rates from search results.
- URL Structure: We’ll create clean, keyword-rich URLs for our pages and posts. WordPress allows us to easily edit these in the page/post editor.
By following these practices, we’re setting our WordPress website up for success. Remember, creating high-quality, valuable content is the foundation of good SEO. As we continue to build and optimize our site, we’ll see improvements in our search rankings and increased traffic over time.
Conclusion
Building a WordPress website is an exciting journey that opens up a world of possibilities for online presence. By following this step-by-step guide, you’ve learned to set up hosting, choose the right theme, enhance functionality with plugins, and create optimized content. These elements work together to create a strong foundation for your website.
Remember, your WordPress site is a living entity that needs ongoing care and updates to thrive. Keep exploring new themes, plugins, and content strategies to keep your site fresh and engaging. With WordPress’s flexibility and your newfound knowledge, you’re well-equipped to create a website that truly stands out and meets your unique needs.